|
If someone had told me about this while I was still in the classroom, you can bet that I would have been using it! Flubaroo is a tool created to grade work that is submitted through a Google Form. Yep, I said it, created to grade work. Eeeeeeeee, so exciting!
Such a time-saver and makes collecting data easy! 
0 Comments
 Think about Back-to-School Night. Parents file in, you are connecting with all of them quickly, trying to make a good first impression, giving them information, and it is just a rush. Then you hit the end of the night, realizing parents didn't fill out the contact log or that you wanted to send a thank you for coming note, but don't know where to send it.
Google Forms is here to help! Go to Google Forms and make a Form, get a URL, shorten it (makes it easier to display), display it in the room OR make a QR code for parents to scan to go there instantly. When they get to the Form, have them put in their contact information. I recommend asking for the following information:
Keep it short and simple. The responses will fill in to your spreadsheet. BAM! Instant contact collection.  Favorite new thing! Choice elimination in Forms. Need parents to sign up for a party in your class? If you dislike getting 3 bags of napkins, use choice eliminator to stop it! Ready to schedule parent/teacher conferences? Parents sign up for their time and it is no longer a choice for others. No more scheduling for the teacher! Planning a carry-in for lunch? Send out what you need and let people choose from a list. How To Make it Happen
Using Google Forms to set up appointments with teachers? parents? staff? A common request is the wish for a confirmation email. Well, the wait is over! If you would like to have a confirmation email sent out to the people submitting their information to your form, this is the way to do it. Step 1: Create a form (keep it open in one tab) Be sure you ask for their email address! Step 2: Click on "View Responses" on the top of the Form (another tab opens, leave it open) Step 3: Open another tab and go here https://sites.google.com/site/formemailer/, click on "Updates" Step 4: Choose the top choice and download the attachments (the little piece of paper at the bottom of the post. See diagram for directions. 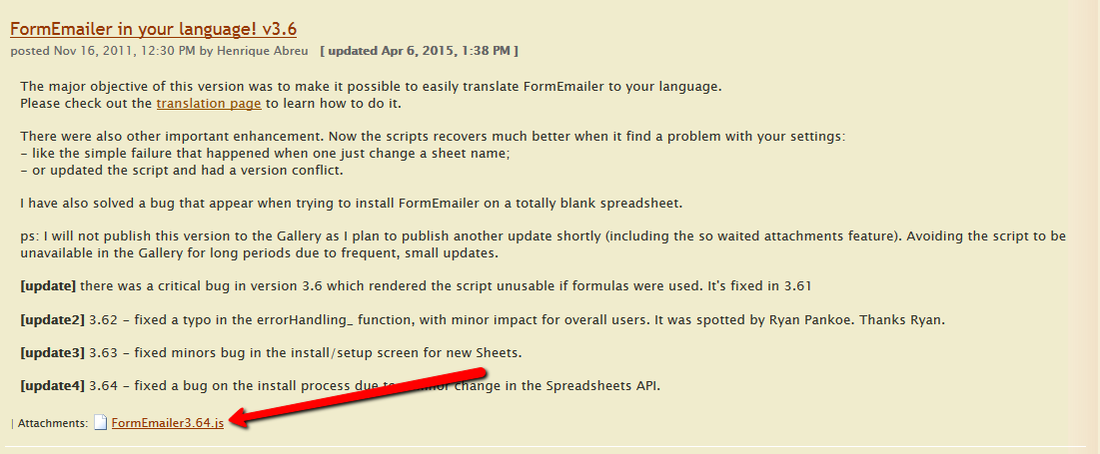 After you download it (pay attention where it goes) Step 5: Right click and open with Notebook (it will look like crazy HTML) Step 6: Select ALL text and copy it Step 7: Go to your responses form, Tools > Script Editor Step 8: Delete the script already there, then paste the script in the box Step 9: Save the script (change the name) to FormEmailer Step 10: Go to Resources > Current Project Triggers (this will tell the spreadsheet when to send the email) Step 11: Look at the diagram for the settings. 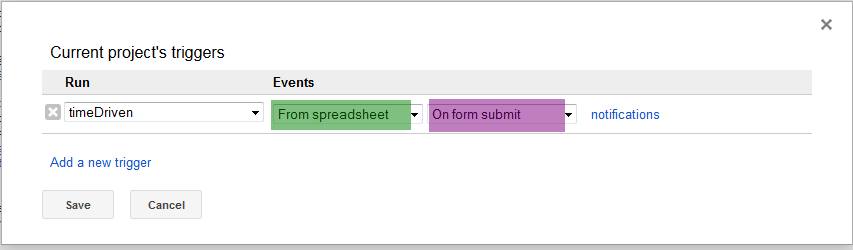 Step 12: Save Step 13: Go to Run > onInstall > Authorize Step 14: Now go back to the Response Sheet > FormInstall (now on your toolbar) > Install > Install (a new sheet is inserted and a new column is on the left side)  Step 15: Go back to FormEmailer at the top > Settings Step 16: To have the email go to someone else, change the Answers Placeholder to the cell with their email address in it Step 17: Click "Insert placeholder" next to the "To" line. Step 18: Take out any information you don't want included that is in the body. Step 19: Save and Close Now when this form is filled out by someone, they will receive an email. If you would like to have another person, like yourself, receive an email, too, we can set that up. This is a process for a confirmation email. This post was inspired by the video tutorial down below from Jen Jonson. |
AuthorFifth grade teacher in a 1:1 iPad classroom, sharing my journey with technology in the classroom Categories
All
Archives
March 2020
|
 RSS Feed