 Think about Back-to-School Night. Parents file in, you are connecting with all of them quickly, trying to make a good first impression, giving them information, and it is just a rush. Then you hit the end of the night, realizing parents didn't fill out the contact log or that you wanted to send a thank you for coming note, but don't know where to send it.
Google Forms is here to help! Go to Google Forms and make a Form, get a URL, shorten it (makes it easier to display), display it in the room OR make a QR code for parents to scan to go there instantly. When they get to the Form, have them put in their contact information. I recommend asking for the following information:
Keep it short and simple. The responses will fill in to your spreadsheet. BAM! Instant contact collection.
0 Comments
 As we start our switch to Gmail for our email accounts here at Hallsville, I know there will be many questions and concerns. I am going to start first with all the BENEFITS of Gmail. Benefits of Gmail 1. Access it from anywhere - phone, tablet, computer, home, school, field trips This means you can connect it to your Gmail app if you wanted to do that. You can switch back and forth between a personal one and your work one. 2. Allows you more options in Google Apps for Education You can create groups, name them, and email to just those groups. 3. Emails from Google Classroom can now go through! Yes, now when you leave a comment on a paper, students will receive the email. They can also use the link to email you now, too. 4. SAFE for students They can only send and receive emails from those with the @hallsville.org domain at this address. Using Gmail I am attaching a link to the Google Gmail training site. This is the best place to start. Then if you realize you need additional help from there, either Google it (haha) or email me! I will be more than happy to help you! Also, I am sending you to the introduction page, on the left you will see "Basics" and "Advanced". Use those as needed!
https://www.google.com/edu/training/get-trained/gmail/introduction.html *Quick note: I learned when using this before: There is a chat feature that only staff has (students should not). If you send a chat message to teachers during class time, that message pops up on the screen. Meaning, if the SB is on, students will see it. Always send a nice, generic message to start the convo! *Also, this site is GREAT for any training you may need on a Google feature like Maps, Calendar, etc. Honestly, this post will probably seem irrelevant to many people. However, I need one place that the teachers not returning and seniors can go to in order to get directions on closing their account with our school domain. But many other people may find these steps useful, too! If you have an Apps for Edu account I have found that I cannot transfer the data to an account that ends in @gmail.com. Am I frustrated by this? Yes. I think it is silly that a senior cannot easily transfer their work to their own account as they go out in the world. I picture resumes they create just being deleted, which stinks. Or that speech I did in high school and was able to reuse with improvements in college...yeah, having your past files can be important! Best Steps I Have Found 1. Open your @hallsville.org account in one browser. Open your new account in another browser or in an incognito (private) browsing window. You can only sign in to one account in a browser at a time. 2. In the @hallsville.org account, go to your Drive. Make a folder named "Move". Put all files and documents in that ONE folder that you want to save. 3. Share it with your new email - It will pop up a box asking if you really want to share it with someone not in our domain. Yes, you do. 4. Go to the @gmail.com account > Drive > Shared with Me. The folder will be there. Click it and at the top of the screen it will say "Add to My Drive". Click that. It may also be on the top right side with a symbol that looks like the image in the green box below.  5. Go to "My Drive" on the left side. It is there. You are still sharing it, so you are NOT done.
6. Go back to the @hallsville.org account. Go to the folder with all the files in it you just transferred. Right click on it > Share > Advanced (bottom right corner) 7. Change your @gmail.com account from "can edit" to "owner". Now you are done! Seems like a lot of headache to do this, but I can't help how Google has chosen to do the transfer. I'm sure there may be an easier way, but this is the best I can find at this time!  Favorite new thing! Choice elimination in Forms. Need parents to sign up for a party in your class? If you dislike getting 3 bags of napkins, use choice eliminator to stop it! Ready to schedule parent/teacher conferences? Parents sign up for their time and it is no longer a choice for others. No more scheduling for the teacher! Planning a carry-in for lunch? Send out what you need and let people choose from a list. How To Make it Happen
Using Google Forms to set up appointments with teachers? parents? staff? A common request is the wish for a confirmation email. Well, the wait is over! If you would like to have a confirmation email sent out to the people submitting their information to your form, this is the way to do it. Step 1: Create a form (keep it open in one tab) Be sure you ask for their email address! Step 2: Click on "View Responses" on the top of the Form (another tab opens, leave it open) Step 3: Open another tab and go here https://sites.google.com/site/formemailer/, click on "Updates" Step 4: Choose the top choice and download the attachments (the little piece of paper at the bottom of the post. See diagram for directions. 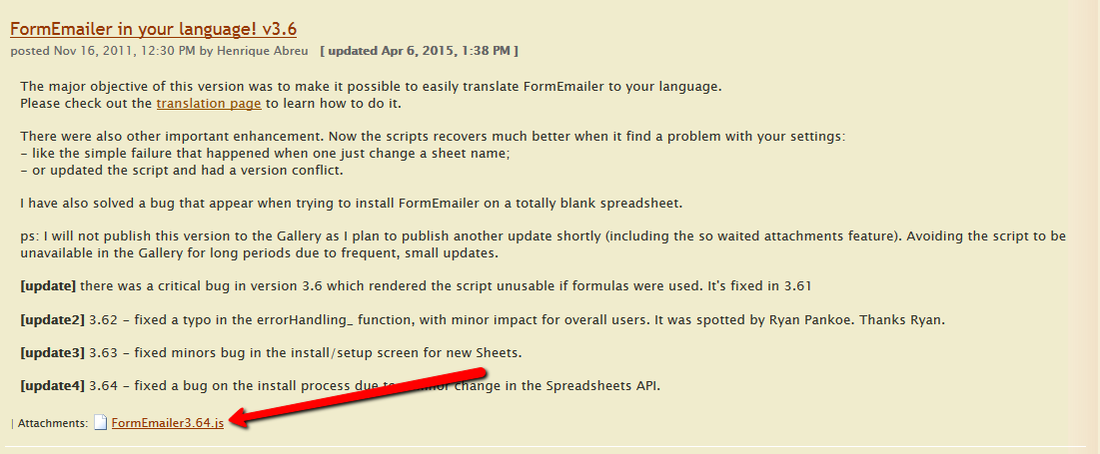 After you download it (pay attention where it goes) Step 5: Right click and open with Notebook (it will look like crazy HTML) Step 6: Select ALL text and copy it Step 7: Go to your responses form, Tools > Script Editor Step 8: Delete the script already there, then paste the script in the box Step 9: Save the script (change the name) to FormEmailer Step 10: Go to Resources > Current Project Triggers (this will tell the spreadsheet when to send the email) Step 11: Look at the diagram for the settings. 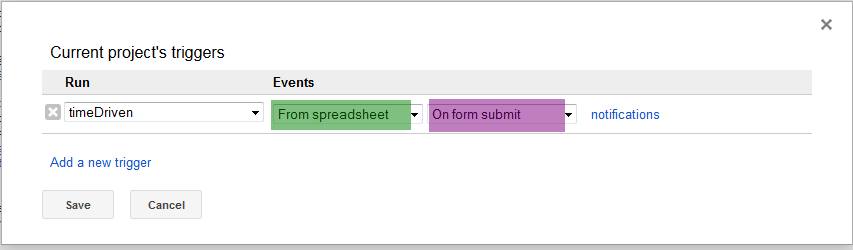 Step 12: Save Step 13: Go to Run > onInstall > Authorize Step 14: Now go back to the Response Sheet > FormInstall (now on your toolbar) > Install > Install (a new sheet is inserted and a new column is on the left side)  Step 15: Go back to FormEmailer at the top > Settings Step 16: To have the email go to someone else, change the Answers Placeholder to the cell with their email address in it Step 17: Click "Insert placeholder" next to the "To" line. Step 18: Take out any information you don't want included that is in the body. Step 19: Save and Close Now when this form is filled out by someone, they will receive an email. If you would like to have another person, like yourself, receive an email, too, we can set that up. This is a process for a confirmation email. This post was inspired by the video tutorial down below from Jen Jonson. 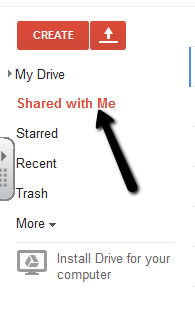 Is there one folder on your Google Drive that you don't want to touch? Let me guess, the "Shared with Me" folder? Yes, this folder is a nightmare for those people who like their files to make sense from an organizational standpoint. I feel the fear when I go in there. No way to organize them, afraid to delete them, curious as to WHY someone would share certain things with you...the list goes on and on.
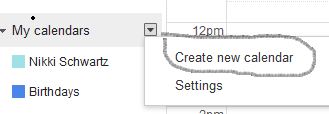
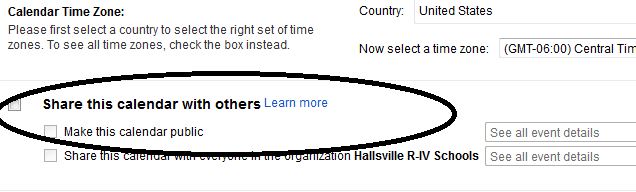
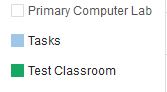
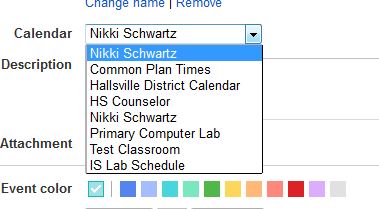
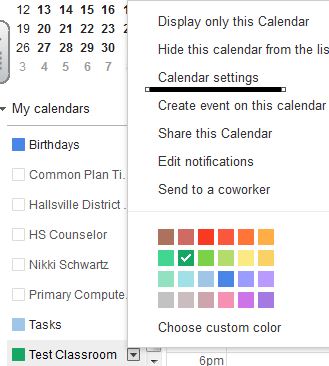
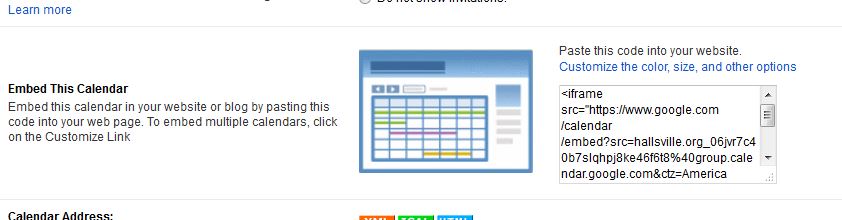
Here is how you can best organize this folder. Things you access regularly: There are documents someone has shared with you that you access almost daily (think, dismissal changes, lab schedules, testing schedules). You can click the box next to those and then choose "Add to My Drive", which has darkened along the top of the screen. It is now added to your Drive where you can place it into your nicely organized folders. Things you never, ever look at: Delete them. But wait, does that delete it from the owner? Nope, it only deletes it from your Drive. The owner still has the original and you no longer have to skip over it in your list. Google Classroom documents: One thing that has come up is that even though Google Classroom creates a nice folder in your Drive, it also puts all those shared documents in the Shared with Me folder. Yep, that right there causes the overwhelmed feeling to rush back! At this time, there is not much you can do to fix that. Some have said you can delete them from "Shared with Me", but there is the concern that it will delete it from the Classroom folder. Not 100% sure about this, but you could try it out. Ultimately, it will still belong to the student, who is the owner of the document. Or just do what I do...avoid that folder unless you know someone JUST shared something with you! Lol! One thing people miss from Microsoft are the templates. No fears, Google has you covered! When you are in the Drive application you wish to use, go to New > From Template. A new tab opens up that may appear blank at first. It defaults to templates created and saved by Hallsville.org users (yes, we can create and save our own...think, common forms we use in the district). From the top bar, you can choose "Public Templates". Once there, you can search and find what you are looking to use. When you find what you want, choose "Use this Template" and it will open a copy. You can rename it as your own at that point. That's it! Easy, right?  Would you like to have a classroom calendar you can display on your webpage? It has never been easier than with Google Calendars! This is a step-by-step on how to get the calendar created and the code to put in the website. I can tell you how to put it into Weebly, but if you need to know how to do it on another platform, let me know and I will look into it for you! Go to Google Calendar on your App waffle (you need to be logged in). Click on each photo to learn more. They go in order of the process. From there, if you are on Weebly, go to the page you would like to insert the calendar onto. On the left side you will see a button that has this icon, </> Embed Code. Click it and drag it where you want it on the page, paste the code you copied, into the box. It should now be on your page. You may have to publish and view the website to see it fully!
Have a collaborative project for students? Did someone delete important information and you need to find out who it was? Welcome to viewing revisions in Google Drive! If you would like to see the revisions done to a Google Drive app, you can do that very easily by viewing the revision history. You can even revert back to an old copy, if you like! Click on File > See Revision History 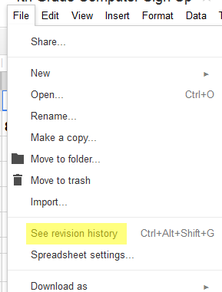
A window will open to the right of your document. 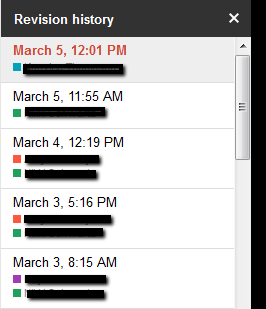
Each person has their own color. The blue is one person, green is one person, orange is one person, and purple is another. You can see that there are multiple orange dots, that is all the same person and the changes they have made. When you click on that revision history, the box turns grey, as shown in the first box above. Then any changes that person made during that revision, will come up in that color on the document, as shown below.  Everything else goes to gray scale, while the revision is in the color of the person that made it.
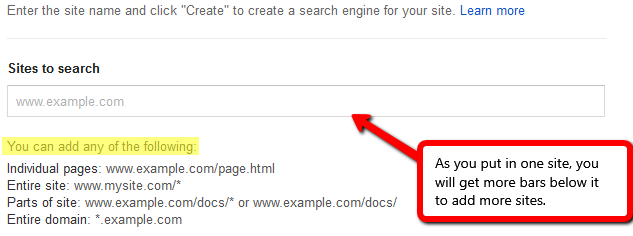
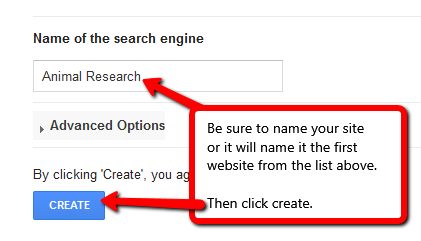
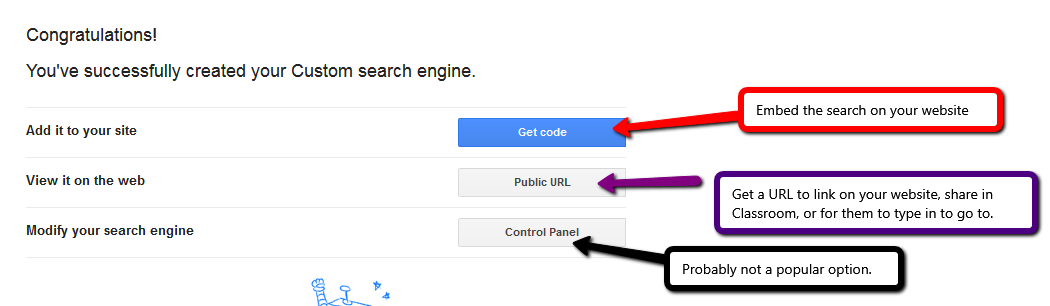
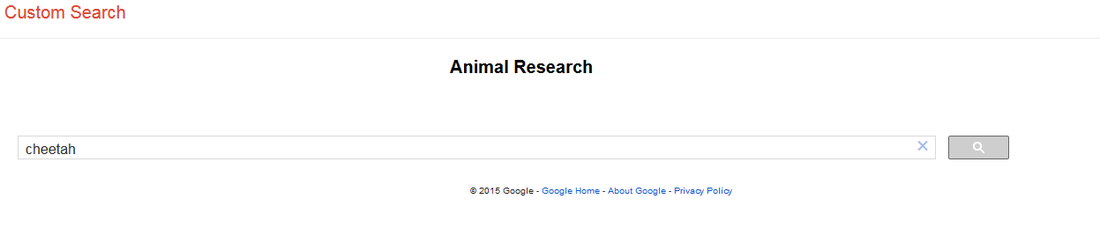
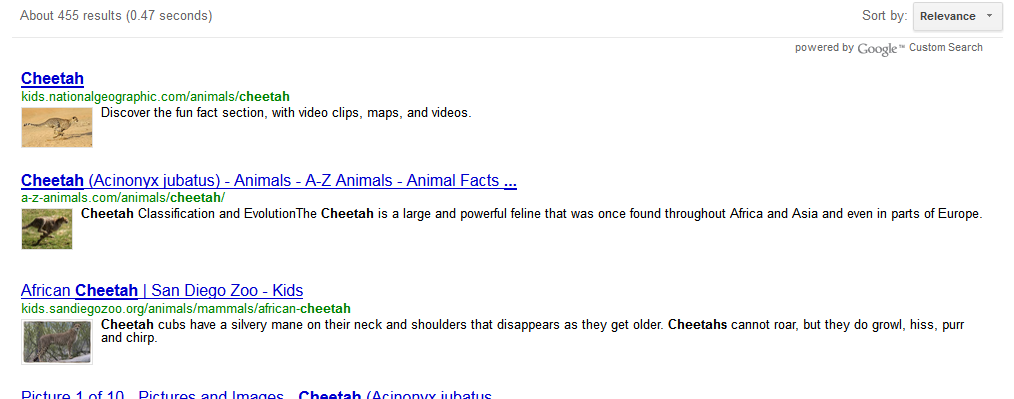
This can be helpful in seeing if a student took your revision suggestions and made them. You can see if someone peer edited a little too much (or wrote the paper for someone else), the time it was worked on last, and probably more! Again, a useful tool for teachers, seeing revision history of a Drive app. This applies to Presentation, Drawing, Spreadsheets, and Docs. It may also apply to other apps, too. I attended the eMINTS conference this past week and this blew my mind! You can make customized Google searches! That means that you pick the sites your kids search from. So cool, especially for those younger kiddos that are just learning to search. Go to https://www.google.com/cse/all to get started. Click on each image to enlarge in order to get a step-by-step on creating a customized Google search for your students! |
AuthorFifth grade teacher in a 1:1 iPad classroom, sharing my journey with technology in the classroom Categories
All
Archives
March 2020
|
 RSS Feed