|
One of our teachers demonstrated Thinglink for the high school teachers during our PLC day a couple of weeks ago. I had seen this in passing, but had never looked at it from an educational standpoint. There are so many GREAT things that can be done with this site. Imagine this, you have an image and on that image there are clickable points. These points include links to websites that give more information, questions to think about, a Google form exit slip/quiz/response...endless possibilities. Your very own interactive poster! First off, cost. Free to educators. Here is the breakdown between the free and paid. 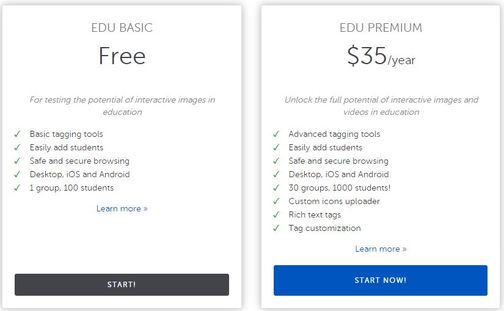 Really, the difference is if you have a lot of students you want on here to create. I think most of us can safely say that we don't have over 100 students. Some of you do. The Premium would be good if you had over 100 students AND you wanted them to be able to create Thinglinks of their own...often. I would not purchase this for just one project. Once you sign up (and you can, using your school Google account - easy peasy!), this is your workspace... 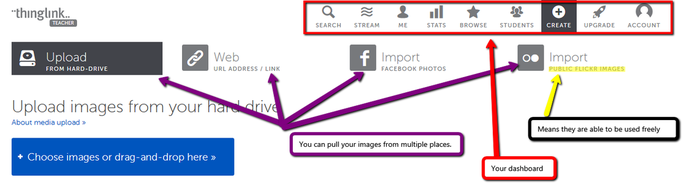 Once you choose your image, it puts it in a workspace. You then click to tag the picture. From there you use the space to the left to add links or text. It is very easy to use. When you are finished, click Save at the bottom. 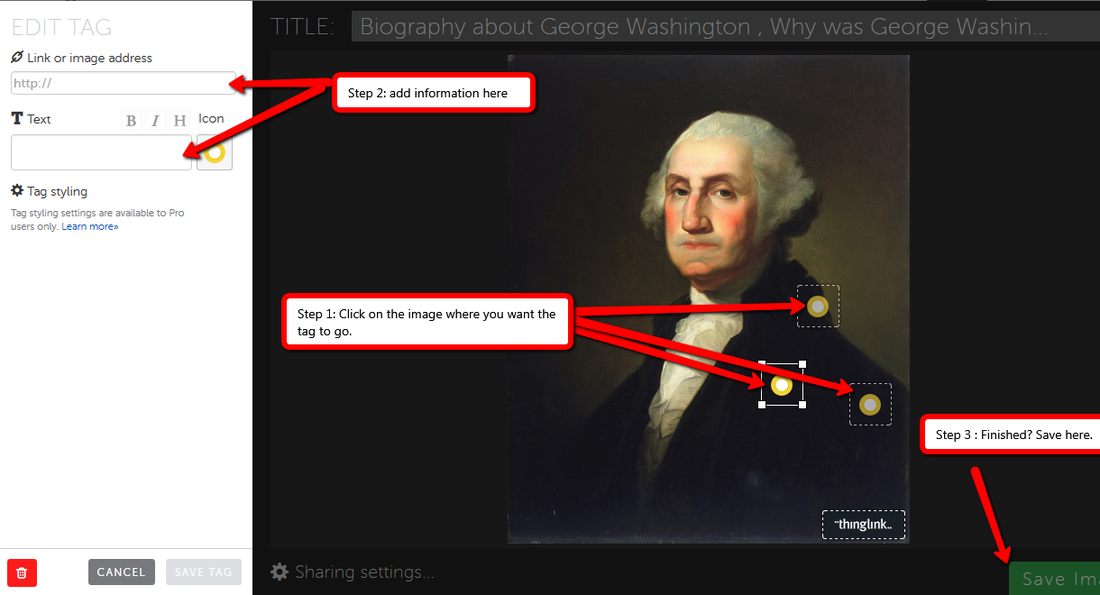 After saving, you can share your Thinglink via social media, with a link, or embed it on your website. So easy. You can even go back in and edit it.
If you use Thinglink in your room, send me the link that either you or your students do! I would love to see them. Better yet, have me come in WHILE you are doing them so I can provide support. Scenario: Student in your classroom watches you introduce a new theory. You ask the student to demo the concept. They say, "I can't do it. I've never been good at this." You sigh. Frustration grows. "Well, try it anyway. You will never be good at it unless you try." How many times has this happened to you? Students say they can't do something, but they don't try. They go ahead and count themselves out before they even get started. This situation applies to technology. I hear these same phrases when I talk about integrating technology. So many educators get hung up on learning something new and feeling they can't do it. Here's a secret, you can do it! How did you learn that new math program? How did you learn to help Timmy not fidget in his seat during a math test? How did you learn that new grading system? We had to learn.  I never want you to do more than you are comfortable with doing, but I want you to challenge yourself to do one thing outside the box every once in awhile. You'd be surprised. Honestly, you really just need to learn enough to get started. Students pick up on things quickly from there. Many of them will troubleshoot it for you, and they SHOULD! They should be the ones that are teaching you and others. We are teaching them teamwork, collaboration, that they are valued, and that they are capable. Also, you are going to gain students that want to learn. They are going to be excited for the technology, for the new website, the new Thinglink, Plickers, Google Classroom, whatever it is that you choose.
On Google Classroom's ad there is a woman named Rosemarie DeLauro that has been teaching for more than SIXTY years and she has a great quote, "You cannot stay in teaching and keep going to the old ways." Her first experience with computers was Google Classroom, which just came out in 2014. It is possible. You can do it, and I am right here to make it easier. Good luck! Have you ever created a Doc, shared it, and instructed people to make a copy, but they start typing on it, causing all documents to be changed? If so, this will solve that problem! This is not necessary if you are sharing through Google Classroom. This is only if you are sharing or emailing the Doc link out to people. Again, you do not need to do this if you are running it through Classroom.   When the user clicks on the bottom link, this is the screen they will get.  This is what their title will read. Why would we need to do this? Forms teachers need to fill out (CARE team), reflection forms after PD sessions, Docs you need only a handful of students to fill out and return, etc. This prevents files from being ruined if deletions or edits occur.
...what do you do in your classroom? Many of us believe we are integrating technology when we have our students present a Powerpoint or type in Word. What if I told you, you are only using technology. Look at the chart below. Where do you see yourself? 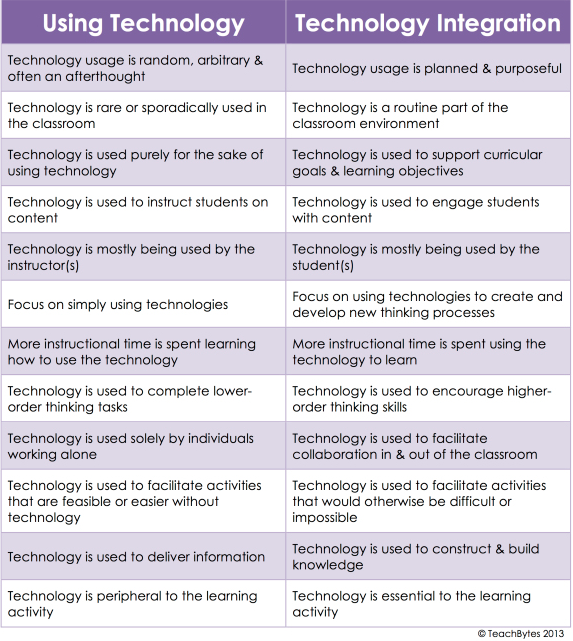 When I first saw this chart, a light bulb truly went off for me. There is a huge difference between using and integrating, and I don't know that those differences have been made clear to all educators. My goal is to use Thursdays to educate teachers on those differences and how to get out of just using technology and how to truly begin integrating it.
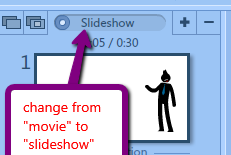
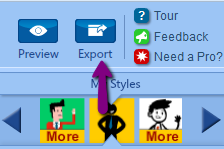
Using the chart above, find an area you would like to work on as far as integration is concerned. Think of it like a growth plan for PD. How can you change ONE thing in your teaching to integrate technology? Comment below if you feel comfortable. Contact me if you want help with the area you choose! Click here to check out the AWESOME video on their site! PowToon came up during our PD day at school Friday, so I wanted to showcase it for you to see what it is all about. In order to get to it, go to Google Drive. Click on "Create" and it may already be an option in your dropdown. If not, you can click on "Connect More Apps" and type in "PowToon". Select PowToonEdu to view it. To connect it, click on the blue "Connect" button. Students can do this, too, if needed. 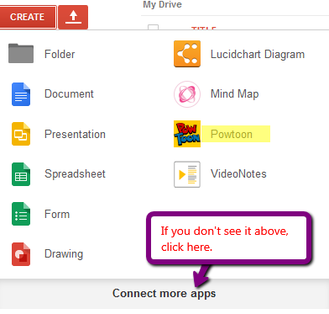 Once you click on PowToon you can start from scratch or choose from templates that can be modified. There is an area to filter their results to the left. Click on the template you want and click "Go". The first time through will take you through a tutorial. The left side is your dashboard, similar to PowerPoint. The slide workspace is in the center. Then on the right is the area where you can pull in your images. All you do is click and drag them to the workspace. Along the bottom is the timer for your slideshow. It can be manipulated by dragging the dark lines to specify how long you want the image to be on the screen. Let the kids explore! They will figure it out quickly. When finished, I recommend changing the area at the top left where it says "movie" to "slideshow" by clicking on it. Then go to "Export" in the top right. It can then be titled and published.
My First PowToon Creation |

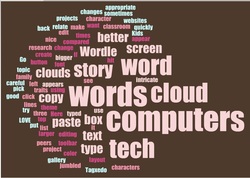 |  |
After they create the word cloud it will appear on an editing screen. Here, they can change the color theme, font, and layout of the words just by using the toolbar on the top of the Word Cloud screen.
**If they want to make changes to the words, they DO NOT hit the back button. Go to the three lines on the left and click edit!**
In the classroom, what can you do with it?
- character traits list for story characters
- type a story and then copy and paste it into the box to see their jumbled story
- a nice project for family or peers
- research projects, put the words in that relate to their topic and "cloud" them
Kids pick up on it quickly and LOVE word clouds! You can also try some other websites as they get better and better. Tagxedo is good and so is Wordle, but be careful of the gallery on Wordle because sometimes there are clouds that are not appropriate.
Author
Fifth grade teacher in a 1:1 iPad classroom, sharing my journey with technology in the classroom
 RSS Feed
Categories
All
6 Word Memoirs
ABCya
Admin
Adobe
Animals
Animoto
Apps
Apps For Ed
Art
Backchannel
Blended Classroom
Blog Summary
Brainbreaks
BreakoutEDU
Calendar
Chrome
Class Dojo
Classroom Management
Coding
Common Beliefs
Common Sense Media
CSFirst
Differentiation
Digital Citizenship
DLDay
Docs
Educreations
Elearning
Email
Extensions
Flipgrid
Flipped Classroom
Forms
Genius Hour
Gmail
Goals
GoNoodle
Google
Google Certified
Google Classroom
Google Drive
Halloween
High School
Instagram
Integration
IOS
IPad
Kahoot
Khan Academy
Lesson Plans
Littles
Management
Math
Music
Mystery Skype
News
Padlet
Parents
PD
Pinterest
Plickers
PowToon
Presentations
Primary Site
Reading
Remind
Revision
Safe Search
Safety
Scholastic
Science
Searching
Smartboard
Social Media
Social Studies
Storytelling
Student Voice
Substitute
Symbaloo
TedEd
Thinglink
Thursday
TodaysMeet
Tuesday
Twitter
Under 5
Videos
Web 2.0
Website Wednesday
Wonderopolis
Word Clouds
Writing
YouTube
Archives
March 2020
September 2019
January 2019
November 2018
September 2018
August 2018
October 2017
September 2017
February 2017
December 2016
October 2016
June 2016
May 2016
April 2016
March 2016
February 2016
January 2016
December 2015
November 2015
October 2015
September 2015
August 2015
July 2015
June 2015
May 2015
April 2015
March 2015
February 2015
January 2015
December 2014
November 2014