 Goals for 2015-2016? Yep, I have some of those. 2015 will mark my 10th year in education, 2nd year as a Technology Integration Specialist. In those 10 years, I have taught 3rd grade, 5th grade, 4th grade, and 2nd grade technology. I have been in two different districts, had 3 different administrators, and taught around 250 students. Wow.
Closing out my first year as Technology Integration Specialist, I am excited to think about what I have in my future plans. We have come a long way this year, Google Apps, Skyping with different states and countries, Kahoot, making videos, and so much more! I am lucky to have teachers that support my crazy ideas and students that are along for the ride! Next year's goals are being written down now. A few of them include:
0 Comments
 Are you in need of music for a slide show? class project? movies your students are creating?
YouTube has a magical solution called YouTube Audio Library. There are 3 sections in this wonderful library. The best is Free Music. You can use this music royalty-free (no need to cite where you used it from, pay money back to the owner, that kind of thing). Just don't use it to make money. Easy as that. If you want to, you have to apply to use it. Use it for your project or other small project, and you are good to go! Ad-supported music is another area where you can get music that copyright owners manage through this section. You will have to check the OWNER'S POLICY! This is different for all users. Really be familiar with the music and its policies before using! Sound effects are another FREE area as well. There are some great sounds and you can search them by their category, like human voices, transportation, doors, etc. Note for our school: Students will have to have YouTube access to these songs at school. Teachers, you can download the files into their folders though. Using Google Forms to set up appointments with teachers? parents? staff? A common request is the wish for a confirmation email. Well, the wait is over! If you would like to have a confirmation email sent out to the people submitting their information to your form, this is the way to do it. Step 1: Create a form (keep it open in one tab) Be sure you ask for their email address! Step 2: Click on "View Responses" on the top of the Form (another tab opens, leave it open) Step 3: Open another tab and go here https://sites.google.com/site/formemailer/, click on "Updates" Step 4: Choose the top choice and download the attachments (the little piece of paper at the bottom of the post. See diagram for directions. 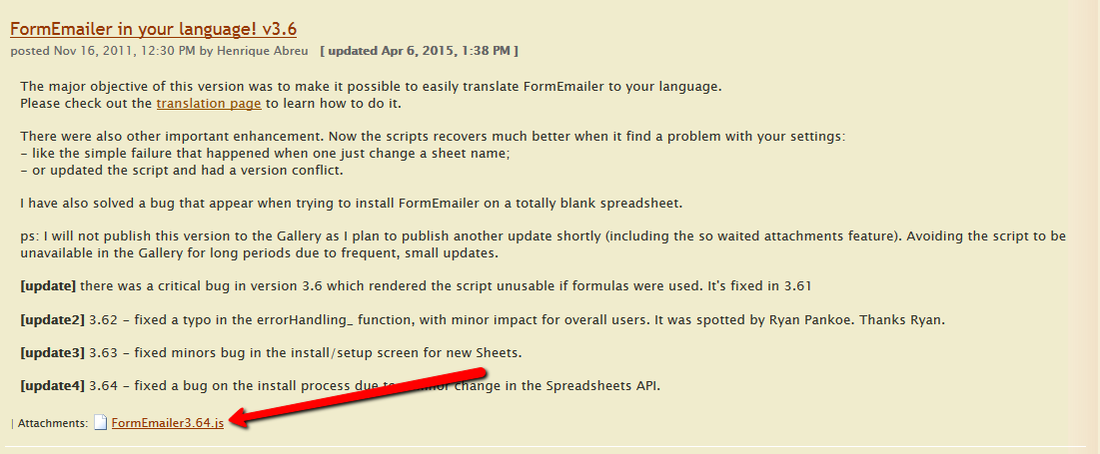 After you download it (pay attention where it goes) Step 5: Right click and open with Notebook (it will look like crazy HTML) Step 6: Select ALL text and copy it Step 7: Go to your responses form, Tools > Script Editor Step 8: Delete the script already there, then paste the script in the box Step 9: Save the script (change the name) to FormEmailer Step 10: Go to Resources > Current Project Triggers (this will tell the spreadsheet when to send the email) Step 11: Look at the diagram for the settings. 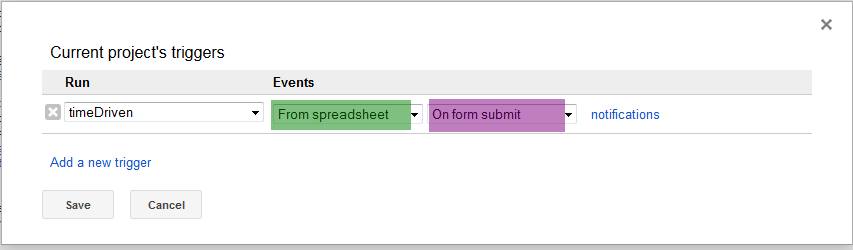 Step 12: Save Step 13: Go to Run > onInstall > Authorize Step 14: Now go back to the Response Sheet > FormInstall (now on your toolbar) > Install > Install (a new sheet is inserted and a new column is on the left side)  Step 15: Go back to FormEmailer at the top > Settings Step 16: To have the email go to someone else, change the Answers Placeholder to the cell with their email address in it Step 17: Click "Insert placeholder" next to the "To" line. Step 18: Take out any information you don't want included that is in the body. Step 19: Save and Close Now when this form is filled out by someone, they will receive an email. If you would like to have another person, like yourself, receive an email, too, we can set that up. This is a process for a confirmation email. This post was inspired by the video tutorial down below from Jen Jonson.  This week I was taking part in the Google Apps for Education (GAFE) Twitter chat (#gafechat). The whole subject had to do with creating videos in the classroom. We discussed how this added to engagement, critical thinking skills, and collaboration.
A lot of people think that having students create videos is just an easy time-filler, but I am here to tell you that with proper planning, this can turn into an activity that boosts learning and really makes students think. I like to think of video creation as the publishing part of a writing piece. Script writing is another genre of writing that needs instruction and modeling to ensure it is done correctly. ReadWriteThink has a great unit for 6-8 on Filmmaking. It is important to teach students the vocabulary of making films. There are a lot of terms specific to filming. Have students plan what their idea is and plan the story. Many films are adapted from great books. They have to write a story to know what direction their film is going. Then they can adapt their stories to scripts, and finally into storyboards. The storyboards are like comic books. You want the students to put their actors where they should stand, give ideas for how long they should be on camera, and what lines should be said, During this time, the actors should be learning their lines, people in charge of the cameras should be learning how to get the best camera shots, different angles, zooming in and out, etc. After students go through and create their storyboards, they should start filming. They may want to do a walk-through before filming to make sure bodies are turned correctly at the camera, their voices are heard, and any other parts they need to include. Then the filming starts. A good filmmaker is always editing and revising their storyboard and scripts, even as the camera is rolling. When the filming is done, the fun of editing comes into play. Students can then piece together their film, manipulate sound, video quality, and transitions. Again, this is a lesson on vocabulary, critical thinking, collaboration, and patience. It can take a lot of patience to learn video editing software. At the end, students can debute their video masterpiece. Let them have a wonderful movie premier, making a big deal out of it. Roll out the red carpet, get the popcorn, and sit back to enjoy! Check out the ReadWriteThink unit here! This may seem like a no-brainer for some of you, but for others, I'm sure your wondering why I am suggesting Pinterest. I talked about this back in January, but I wanted to include some more information about it now. Pinterest is a world of wonder that can make you lose hours of your day without realizing it. You find one thing you are interested in and lose yourself in websites galore. Then it leads you to something else, getting lost in that next. The web it weaves is intense, but so worth it! Many of us use Pinterest for our personal needs, looking up cute classroom decor, meal ideas, clothing we wished we owned, gift ideas...the list goes on and on. But this genius website can be ideal for teachers to use for reaching out to families. How many times have we searched Pinterest for lesson ideas? Probably more times than we care to admit. How many times has a parent contacted the teacher for ideas of what to do to help at home? Again, probably more times than we can count. This is where Pinterest can help. When you sign up for Pinterest, I recommend keeping your personal account separate from your classroom account. Parents don't care what clothing you hope to wear this spring or how to poach an egg. Keep it separate. Create boards that revolve around particular skills in your classroom, "Vowel sounds", "Multiplication", "Civil War", etc. Then pin the websites to those boards. Here are boards... 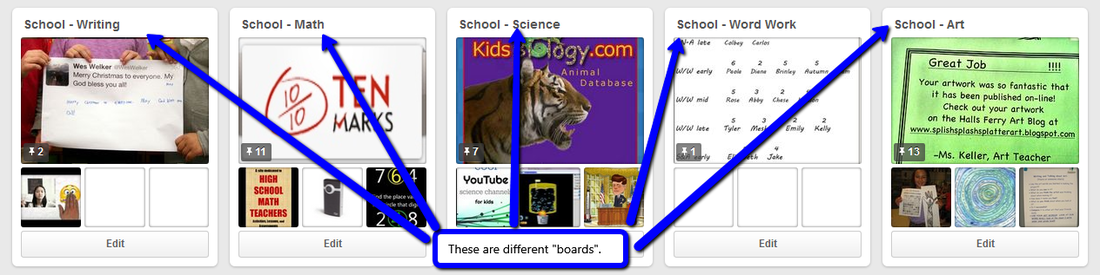 These are the pins on my boards...  You can embed your Pinterest account on your website. 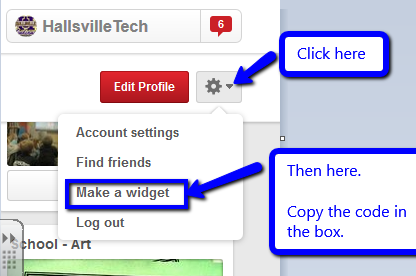 Or provide the link for parents. This is a great way to provide them with resources to use at home! Let me know if you have any questions about using Pinterest for your classroom. I have had a couple of teacher friends do this after I talked to them about it, and they said it was very well-received by parents. Make this a goal for the next school year!
Check out my page on Pinterest! 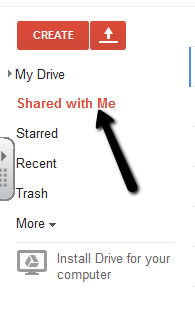 Is there one folder on your Google Drive that you don't want to touch? Let me guess, the "Shared with Me" folder? Yes, this folder is a nightmare for those people who like their files to make sense from an organizational standpoint. I feel the fear when I go in there. No way to organize them, afraid to delete them, curious as to WHY someone would share certain things with you...the list goes on and on.
Here is how you can best organize this folder. Things you access regularly: There are documents someone has shared with you that you access almost daily (think, dismissal changes, lab schedules, testing schedules). You can click the box next to those and then choose "Add to My Drive", which has darkened along the top of the screen. It is now added to your Drive where you can place it into your nicely organized folders. Things you never, ever look at: Delete them. But wait, does that delete it from the owner? Nope, it only deletes it from your Drive. The owner still has the original and you no longer have to skip over it in your list. Google Classroom documents: One thing that has come up is that even though Google Classroom creates a nice folder in your Drive, it also puts all those shared documents in the Shared with Me folder. Yep, that right there causes the overwhelmed feeling to rush back! At this time, there is not much you can do to fix that. Some have said you can delete them from "Shared with Me", but there is the concern that it will delete it from the Classroom folder. Not 100% sure about this, but you could try it out. Ultimately, it will still belong to the student, who is the owner of the document. Or just do what I do...avoid that folder unless you know someone JUST shared something with you! Lol!  I discovered a website that my second graders LOVED this week! The San Diego Zoo has a wonderful section for kids. There are videos, live web cams, activities, games, jobs at the zoo, and information about different animals. This site is very interactive and the kids were so excited about it! AnimalsStudents can learn about the different types of animals: mammals, arthropods, reptiles, amphibians, and birds. In that section they can read about what makes animals fit into the specific category. Then they can explore pictures of animals from the zoo that fit into that category. Games
ActivitiesFind different games and crafts you can do and make at home! There are some really neat ideas in here for families. Animal Cams and VideosThere are some amazing videos the San Diego Zoo has put together for kids! They talk about different animals and the kids get to see them up close and personal. Some that we watched were how the elephants are taken care of at the zoo, baby lions the zoo had to take care of after the mom stopped caring for them, a Golden Eagle that had to be cared for after an injury, and more! The other popular thing here are the animal cams. The kids can see the animals in real time at the zoo. Pandas, elephants, apes, and polar bears all have cameras in their exhibits. We have been fortunate enough to see the pandas chomping on bamboo in each of my classes so far! Jobs at the ZooThere are more than just animals and zoologists at the zoo! Learn all about the jobs at the zoo in this section. People can learn what the jobs are, challenges, and how they can get a job like that in the future. I love this section so kids can learn about careers they may have not heard about before.
What a great resource! I encourage the kids to view the videos and check out the areas at home. One thing people miss from Microsoft are the templates. No fears, Google has you covered! When you are in the Drive application you wish to use, go to New > From Template. A new tab opens up that may appear blank at first. It defaults to templates created and saved by Hallsville.org users (yes, we can create and save our own...think, common forms we use in the district). From the top bar, you can choose "Public Templates". Once there, you can search and find what you are looking to use. When you find what you want, choose "Use this Template" and it will open a copy. You can rename it as your own at that point. That's it! Easy, right?  |
AuthorFifth grade teacher in a 1:1 iPad classroom, sharing my journey with technology in the classroom Categories
All
Archives
March 2020
|
 RSS Feed